Sunday, December 29, 2013

Recipe (Re)creation: Chocolate + Orange Florentines


This recipe is courtesy of the Ottolenghi Cookbook, the newest cookbook by the authors of bestsellers Plenty and Jerusalem.  This book is equally wonderful and I highly recommend it.  I went straight to this florentine recipe since I have always had a soft spot for chocolate oranges around the holidays.  I got one in my stocking every year as a kid,  and now that flavor combination always reminds me of Christmas.  I actually looked high and low for chocolate oranges to put in our stockings this year and came back empty-handed, so these helped fill the void.  I ended up drizzling dark chocolate on the cookies, but they are also delicious on their own without the chocolate.  Either way, you can't go wrong.

Makes about 20 cookies

Ingredients:

  • vegetable oil
  • 2 egg whites
  • 3/4 cup plus 1 tbsp powdered sugar
  • 2 3/4 cups sliced almonds
  • zest from 1 orange
  • 1/2 cup dark chocolate ships

Directions:

-Preheat oven to 300 degrees F.
-Line 2 baking sheets with parchment paper and brush with oil.
-Put egg whites, powdered sugar, sliced almonds, and orange zest in a bowl.
-Mix gently and pick up the mix to make small mounds evenly spaced on sheet.
-Dip a fork in cold water and flatten each mound thinly.
-Place one baking sheet in the oven and bake for about 15 minutes.
-Repeat with the second sheet, baking until lightly golden.
-Meanwhile heat 1/2 cup dark chocolate chips over a double burner.
-When fully melted, drizzle chocolate on the cooled cookies using a fork.
-Eat immediately or store in a sealed container.

Thursday, December 26, 2013

Recipe Creation: Perfect Herb Roasted Chicken


I made this chicken for Christmas dinner and it was a total hit.  Chicken can get a bad rap for being boring or dry and this recipe is neither!  The preparation is pretty straightforward and foolproof, yet it looks and tastes surprisingly impressive.  The key is in the basting- it keeps the bird nice and juicy and makes the skin ultra crispy.  This is a perfect staple to have in your back pocket.  Serve with roasted root vegetables and a kale salad and you have yourself a perfect winter meal!

Serves 4

Ingredients:

  • 4-5 lb organic whole chicken
  • 2 tbsp olive oil
  • Sea salt & ground pepper
  • 1/2 lemon
  • 1/2 peeled yellow onion
  • 3 sprigs rosemary
  • 3 sprigs thyme

Directions:

-Preheat the oven to 425 degrees F.
-Wash and dry the chicken and rub all sides with olive oil.
-Place the chicken breast side up on a roasting dish.
-Season the inside and outside of the chicken with salt and pepper.
-Stuff the cavity with the lemon & onion and a sprig each of rosemary and thyme.
-Next, pull the leaves off the remaining rosemary and thyme sprigs.
-Carefully push your fingers under the chicken skin to loosen and make a pocket.
-Put the remaining herbs under the chicken skin and distribute evenly.
-Roast the chicken for 1 1/2 hours, basting every 1/2 hour with the juices in the pan.
-Remove chicken when the skin is nice and crispy and the thermometer reaches 180 F.
-Let the chicken rest for 10 minutes, then transfer to a platter.
-Pour 1/2 cup boiling water into the roasting pan & loosen any brown bits with a spoon.
-Pour the rich juices from the pan into a gravy boat and serve alongside the chicken.


Wednesday, December 25, 2013

Recipe (Re)creation: Mom's Puffy Pancake


While the holidays are always joyful, they never fail to make me miss my mom dearly. My best attempt at keeping her here in spirit is to make her signature dishes throughout the holidays.  This puffy pancake was one of my absolute favorite breakfast treats growing up.  I would beg for it every weekend and my mom made it for me and my sister every Christmas morning without fail.  This morning I am channeling my mom and spoiling myself (and family) with this beautifully delicious breakfast.  It serves two very hungry people or three to four as a small breakfast.  It looks so impressive, but it's actually quite simple (shhh) and is sure to make your family and friends feel special.  Serve with powdered sugar, a squeeze of fresh lemon juice, and any berries you have on hand.

Serves 2-4

Ingredients:

  • 2 tablespoons unsalted butter
  • 2 large eggs
  • 1/2 cup flour
  • 1/2 cup milk
  • 1/4 teaspoon salt
  • Optional topping:
    • powdered sugar
    • fresh lemon juice
    • berries

Directions:

-Preheat oven to 400 degree F.
-Place the butter in a 9 inch round baking dish and place in the oven to melt.
-Brush the butter all over the bottom and sides on the dish.
-Whisk together the eggs, then add the flour, milk and salt and mix well.
-Pour into the dish and bake for 25-30 minutes, or until golden brown and puffy.
-Serve immediately with lemon juice, powdered sugar, and berries.

Monday, December 23, 2013

Recipe Creation: Christmas Pozole


I love this soup for so many reasons.  It is adapted from this recipe that I came across a few weeks ago, and I can't tell you how happy I am that I did.   It is a bit of a labor of love, but it is one of the most comforting, satisfying, and nutrient rich dishes I can imagine.  I made it a few nights ago for my dad who had the flu and he called it the 'penicillin' of soups.  I think one of the best parts about this dish is the garnishes.  You can play around with any toppings that appeal to you.  I highly recommend avocados, sliced radishes, jalapeño, cilantro, oregano, and lime juice.  Plus, it just so happens to be green and red, so it's the perfect Christmas soup.  This one is guaranteed to keep the relatives happy : )

Serves 4-6

Ingredients:
  • 1 29 oz can of cooked hominy
  • 1 large white onion, sliced thinly
  • 6 garlic cloves, peeled and chopped
  • salt
  • 2 large chicken breasts, bone-in & skin-on
  • 1/2 cup pumpkin seeds
  • 1 lb tomatillos, husks removed and rinsed
  • 1 bunch cilantro
  • 1 teaspoon dried oregano
  • 2 tbsp canola oil
  • Optional toppings:
    • sliced radishes
    • chopped avocado
    • sliced limes
    • diced jalapeño
    • more cilantro & oregano

Directions:


-Bring 8 cups of water to boil in a large stockpot. 
-Add 3 of the chopped garlic cloves, 1/2 of the sliced onion & 1 tsp salt.
-Simmer with the top on the pot for about 10 minutes. 
-Next, add the chicken breasts to the pot and cook uncovered for 20 minutes.
-Remove the chicken with tongs and place on a plate to cool.
-Meanwhile, strain the broth and set aside for later.
-When the chicken is cool, shred it and set aside.
-Next, grind the pumpkin seeds in a blender and place in a small bowl.
-In a large saucepan, heat 3 cups water & add the whole tomatillos and the remaining onion.
-Bring to a boil and simmer, covered, for 10 minutes.
-Once the veggies are cooked through, transfer them (discarding the liquid) into the blender.
-Add the oregano, the remaining garlic, 1/4 cup cilantro, and 1 1/2 tsp salt & blend thoroughly.
-Meanwhile, heat the canola oil in a large stock pot and add the green sauce from the blender.
-Cook the sauce, uncovered, for about 8 minutes or until it thickens slightly.
-Next, add the ground pumpkin seeds and 1 cup of the reserved chicken broth.
-Cook for another 5 minutes, then add the chicken, hominy, and 3 more cups of broth.
-Simmer, partially covered, for about 15 minutes. 
-Stir in another 1/4 cup cilantro and season with salt to taste.
-Ladle the soup into big bowls, garnish to your liking, and promptly devour.

Friday, December 13, 2013

Libation Creation: Santa's Special Sauce


This cocktail was inspired by a delicious drink called the Maple that I enjoyed one night at Farley Bar in Sausalito.  It is the perfect wintery treat to warm you on a cold night.  It even appeals to non-Bourbon drinkers since its sweet and refreshing.  I made this recently for a holiday party and it was a total hit.  It works well served in a pitcher and the recipe can easily be multiplied for a crowd.  This drink is guaranteed to make your spirits bright!  I mean, how else do you think Santa gets through Christmas night? Ho Ho Ho...

Makes 1

Ingredients:

  • 3/4 oz fresh lemon juice
  • 3/4 oz maple syrup
  • 2 oz Bourbon (Maker's Mark)

Directions:

-Pour ingredients into a cocktail shaker with ice.
-Shake until well blended and pour into a low tumbler with ice.
-Drink and repeat.


Saturday, November 23, 2013

Recipe (Re)creation: Bi-Rite's Pumpkin Ice Cream with a Kick


I LOVE anything with pumpkin in it and I love ice cream, so clearly this combo is my match made in heaven.  This is one of Bi-Rite's most popular flavor during the holidays and it's the perfect ice cream to serve alongside apple, pumpkin, or pecan pie at Thanksgiving.  It's also perfectly satisfying on its own.  We can thank their cookbook, Sweet Cream and Sugar Cones, for another fabulous recipe.  I added a little tablespoon of bourbon at the end, which is not something that Bi-Rite includes in their recipe, but a girl's gotta have a little fun in the kitchen.

Ingredients:

  • 6 large egg yolks
  • 1/2 teaspoon ground cinnamon
  • 1/2 teaspoon ground ginger
  • 3/4 cup packed brown sugar
  • 2 cups heavy cream
  • 1/2 cup 1% or 2% milk
  • 1/2 teaspoon kosher salt
  • 3/4 cup pumpkin purée
  • 1/2 teaspoon pure vanilla extract
  • 1 tablespoon bourbon

Directions:

-Place the bowl of your ice cream maker in the freezer so it is properly frozen and ready for use.
-Whisk the egg yolks in a medium-sized metal or ceramic bowl.
-Then add the cinnamon, ginger and half of the brown sugar (6 tablespoons).
-Next, in a medium saucepan, stir together the cream, milk, salt, and the remaining brown sugar (6 tablespoons) and put the pan over medium-high heat.  
-When the mixture begins to simmer, reduce the heat to medium. 
-Scoop out 1/2 cup of the warm cream mixture into the bowl with the eggs and continue whisking.  
-Repeat this same process with anouther 1/2 of the cream.
-Using a spatula, stir the remaining cream in the saucepan and slowly pour the cream and egg mixture back into the saucepan.  
-Cook the mixture over medium heat, stirring constantly until it is thickened and coats the spatula.
-Turn off the heat and add the pumpkin, stirring or whisking to combine well.
-Strain the mixture through a fine strainer into a clean bowl and place the bowl in an ice water bath, stirring until the mixture is cool.
-Cover the bowl in plastic wrap and refrigerate for at least 2 hours.
-Next, whisk the vanilla bean and bourbon into the chilled pumpkin cream. 
-Freeze the mixture according your ice cream maker's instructions. 
-Enjoy immediately or transfer to a container and freeze for a few hours.

Bi-Rite Creamery
3692 18th Street
San Francisco, CA
(415) 626-5600
biritecreamery.com

Saturday, November 16, 2013

Recipe Creation: "Truffalo" Wings + Truffle Ranch Sauce


These were inspired by a wings competition (and yes, they did win a trophy) and now I make them on a regular basis.  I mean, what could be better than truffle chicken wings with three kinds of truffle? Especially when you can call them Truffalo Wings! Leave it to me to add a little class to football season ; )

Serves 2-4

Ingredients:

  • 2 lbs chicken wings
  • l lemon, juiced
  • 1/2 tbsp ground pepper
  • 1/2 tbsp garlic powder
  • 2 tsp truffle salt
  • 1 tsp dried thyme
  • 1/4 tsp cayenne pepper
  • 2 tbsp unsalted butter, melted
  • 1/4 cup grated truffle pecorino
  • 1 tbsp black truffle oil
  • 1/3 cup ranch dressing

Directions:

-Preheat oven to 500 degree F and line a large baking sheet with tin foil.
-Toss the wings with the lemon juice in a large bowl.
-Then add the garlic powder, ground pepper, truffle salt, thyme, and cayenne.
-Next add the melted butter and stir thoroughly so the seasoning is evenly distributed.
-Arrange on a baking sheet and bake for 20 minutes, then flip the wings and rotate the sheet.
-Bake for another 10 minutes, or until wings are browned and cooked through.
-Remove from oven and top with truffle pecorino.
-Whisk the ranch dressing with 1 tbsp truffle oil.
-Enjoy immediately and serve with the truffle ranch dipping sauce.

Wednesday, November 13, 2013

Recipe (Re)creation: Roasted Delicata Squash + Kale Salad


This recipe is loosely based on a recipe I came across on 101 Cookbooks.  I loved the idea of slathering the delicata squash in a miso harissa marinade for a little extra flavor.  I used brown miso paste and harissa spices, but you can substitute with white miso, or harissa paste if you can't find those exact ingredients.  I also threw in some pomegranate seeds, toasted pumpkin seeds, and feta to add some creaminess and crunch to the salad.  This is a perfect seasonal salad to add to your fall repertoire.

Serves 2-4

Ingredients:

  • 3/4 lb delicata squash
  • 1/3 cup olive oil
  • 2 tbsp brown miso paste
  • 1 tsp harissa powder
  • 1/2 lemon, juiced
  • 1 bunch dino kale, finely chopped
  • 2 tbsp toasted pumpkins seed
  • 1/4 cup pomegranate seeds
  • 1/4 cup feta

Directions:

-Preheat oven to 400 degrees F and line a baking sheet with tin foil.
-Wash and dry the squash and and cut it in half lengthwise.
-Scoop out the seeds and cut the squash in 1/2 inch moons.
-Place the squash on the foil lined baking sheet.
-Whisk the olive oil, miso and harissa together in a small bowl.
-Scoop 2 tbsp of the miso harissa mixture onto the squash and distribute evenly.
-Bake in the oven for 25-30 minutes, or until cooked through and beginning to brown.
-Meanwhile, add the lemon juice to the miso harissa mixture and whisk.
-Put the finely chopped kale into a large bowl.
-Add the miso harissa dressing and stir until evenly distributed.
-Top with the roasted squash, pomegranate seeds, pumpkin seeds and feta.

Wednesday, November 6, 2013

Recipe Creation: Balsamic Roasted Butternut Squash + Brussels Sprout Quinoa


Ahhh, fall has arrived and with it, my favorite produce!  I love hearty squashes & root vegetables and I love that all they need is a hot oven and some olive oil for their best flavors to come out.  This dish can be eaten as a main dish since it has the protein rich quinoa, or it can be served as a side.  For me, it is the perfect weeknight meal on a chilly night.  Keep this one bookmarked as a great option for a Thanksgiving side too.

Serves 2 (as a main)
Serves 4-6 (as a side)

Ingredients:

  • 1 lb cubed butternut squash
  • 3/4 lb brussels sprouts, trimmed and halved
  • 1/2 cup dried red or rainbow quinoa
  • 1 cup water
  • 1/3 cup chopped walnuts
  • 1/4 cup dried currants
  • 1/4 cup grated Truffle Pecorino (or Parmesan)
  • 1/3 cup balsamic vinegar
  • 2 tbsp olive oil
  • 1 tbsp honey
  • Salt & pepper

Directions:

-Preheat oven to 450 degree F.
-Line a baking sheet with tin foil and add squash and brussels sprouts.
-Drizzle with olive oil and season with salt and pepper.
-Roast in the oven for about 25 minutes, or until cooked through.
-Meanwhile, heat a saucepan over medium heat and add the water and quinoa.
-Simmer for about 20 minutes, or as directed on the box.
-Whisk together the balsamic, olive oil and honey.
-Transfer the quinoa, squash, and brussels sprouts to a large bowl.
-Toss with the balsamic dressing, currants, and chopped walnuts.
-Liberally sprinkle freshly grated truffle pecorino on top.

Wednesday, October 16, 2013

Recipe Creation: Parmesan Roasted Asparagus


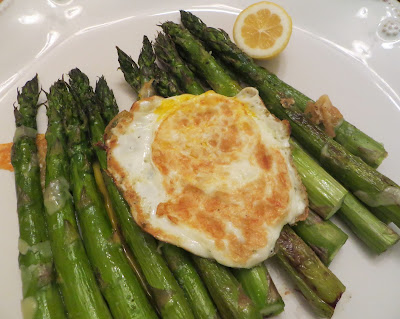
This tasty dish is the perfect side to any meal.  Its a great go-to when you want something green on your plate and don't feel like a salad.  Adding the parmesan at the end just ups the yum-factor.  Also, don't worry if you can't find Meyer lemons.  They just happen to be my favorites, but any lemon will do the trick.  This dish looks and tastes fancy, but it is oh-so-easy and healthy.  You can even throw a fried egg on top if you want to have it like a true Italian.

Ingredients:

  • 1 bunch asparagus
  • 1 tbsp extra virgin olive oil
  • salt & pepper, to taste
  • 1 Meyer lemon wedge
  • freshly shaved parmesan

Directions:

-Preheat oven to 400 degrees F and line a baking sheet with tin foil.
-Wash and trim the tough bottom ends off the asparagus.
-Place on the baking sheet and toss in olive oil, salt & pepper.
-Roast the asparagus in the oven for 15-20 minutes.
-Quickly remove from oven and sprinkle with shaved parmesan.
-Place the asparagus back in the oven for about 1 minute, or until the cheese has melted.
-Remove the asparagus from the oven and serve with a squeeze of fresh lemon.

Sunday, September 22, 2013

Recipe Creation: Kale + Quinoa Pilaf with Sautéed Chanterelles


This dish combines all of my favorite foods AND it's super healthy and satisfying.  I can rarely convince my husband to do a vegetarian dinner, but he is more than happy to eat this dish on its own any day of the week.  The lemon adds a nice zesty flavor and the goat cheese balances out the acidity of the dish.  Top it with some buttery sautéed chanterelles and you have yourself a restaurant worthy meal.  This is my version of a happy meal.  Kinda makes me want to hum when I eat it...

Adapted from Food 52

Serves 2-4

Ingredients:

  • 2 cups water
  • 1 cup rainbow quinoa
  • 1 bunch kale, ribs removed + roughly torn
  • 3 green onions, finely chopped
  • 1/3 cup goat cheese
  • 3 tbsp toasted pine nuts
  • 1 tbsp hazelnut oil
  • 1 lemon, zested and juiced
  • 1 cup chanterelles, sliced
  • 1 tbsp butter
  • salt & pepper, to taste

Directions:

-Bring the water to boil in a medium saucepan with a lid.
-Add the quinoa and simmer over low heat for about 10 minutes.
-Add the kale and let steam for an additional 5-10 minutes.
-Meanwhile, heat a small skillet on medium heat and add the butter.
-Sauté the chanterelles for about 10 minutes, or until lightly browned & cooked through.
-Mix the green onions, goat cheese, pine nuts, oil, lemon juice & zest in a large bowl.
-Scoop in the cooked quinoa and kale and mix thoroughly.
-Top with chanterelles and season with salt & pepper.

Thursday, September 12, 2013

Restaurant (Re)creation: CK's Coconut Sorbet


These balmy days in San Francisco leave me craving my favorite refreshing indulgence: coconut sorbet.  What I love most about coconut sorbet is that it is creamy like ice cream (without the guilt factor) and it doesn't taste icy or watery like some sorbets.  My absolute favorite coconut sorbet is made at a restaurant called CK's in Hailey, Idaho.  Every time I am in the Sun Valley area I go to CK's, and every time I go to CK's I get the coconut sorbet.  Now you see why I had to figure out how to make this lovely treat in the comfort of my own home.  I did inquire about the restaurant's recipe, and while they did not divulge all of their secrets, they did tell me that the key ingredient that keeps it smooth and creamy is VODKA. Who knew?  So I did a little experimenting with my Cuisinart Ice Cream Maker and think this version is pretty darn tasty.  Hope you enjoy it as much as I do!

Serves 6

Ingredients

  • 2 15 oz. cans light coconut milk
  • 1/3 cup light agave nectar
  • 1/2 cup unsweetened shredded coconut
  • 1 tbsp vodka
  • 1 pinch sea salt

Directions

-Place your ice cream maker bowl in the freezer ahead of time and make sure it is sufficiently frozen before use.
-In a large heavy bottomed saucepan, heat the coconut milk, agave, shredded coconut and salt.
-Bring to a simmer and remove from heat.  Let cool to room temperature.
-Place the mixture in the refrigerator for at least 2 hours. 
-Meanwhile, remove frozen ice cream bowl from the freezer and place it in the ice cream maker.
-Turn on the maker and pour in the mixture, adding the vodka last.
-Leave ice cream maker on for 15-20 minutes.
-Serve immediately or place in a container and store in the freezer to enjoy later!


CK's Real Food
320 Main Street South
Hailey, Idaho
(208) 788-1223
ckrealfood.com

Thursday, August 22, 2013

Recipe Creation: The Perfect Grilled Artichoke


Artichokes are tough.  Seriously.  I have failed many a times trying to cook these perfectly.  If you just grill them, they are too tough and if you just steam or boil them, you don't have those beautiful grill marks and charred flavor.  So, I decided to do both!  I was trying my best to (re)create my favorite grilled artichoke at Lolinda and I don't think you'll be disappointed!  In terms of serving the artichoke, I prefer serving it with Lemonaise (lemon aioli) or melted butter, but you can also make extra garlic oil and dip it in that too.  The best thing about artichokes is that they are delicious AND fun to eat ; )

Serves 2

Ingredients:

  • 1 artichoke
  • 1/2 lemon, cut into wedges
  • 1/4 cup olive oil
  • 2 cloves garlic, finely chopped
  • Salt & pepper, to taste

Directions:

-Preheat the grill to 400 F.
-Fill a large bowl with cold water and add a wedge of lemon.
-Meanwhile, bring a large pot of water to boil.
-Trim the artichoke and cut it in half.
-Immediately place the artichoke halves in the cold lemon water.
-Remove halves momentarily to scoop out the fuzzy center of each artichoke.
-Place artichokes in the pot and boil for 15 minutes.
-In a small bowl, mix the oil, remaining lemon juice, and garlic together in a bowl.
-Season the olive oil & garlic mixture with salt and pepper, to taste.
-Remove the artichokes from the boiling water and brush with the garlic mixture.
-Place on the grill, flat side down, for 5-8 minutes.
-Remove from grill and serve with aioli, butter, or more garlicky olive oil.

~Enjoy~

Monday, August 19, 2013

Recipe (Re)creation: Crispy Brown Sugar Salmon


If you are anything like me, this salmon will quickly become a bi-weekly staple (at the least).  My dear friend and food blogger for Pink Brandywine introduced me to this preparation and I haven't looked back.  Honestly, even the salmon skeptical (like my husband) love this dish!  The key to this recipe is you have to plan ahead a bit.  Ideally, you want to get your salmon the day before, so you can marinate it overnight.  If that isn't in the cards for you, then at least try to marinate it for 2-4 hours before you start cooking it.  The best part about this dish is it tastes buttery, sinful, and delicious, but it is INCREDIBLY healthy.  I would call that a win.

Serves 2

Ingredients

  • 3/4 lb- 1 lb salmon fillet
  • 3-4 tbsp soy sauce
  • 1 tbsp mirin rice cooking wine
  • 2 tsp vegetable oil
  • 1 tbsp brown sugar
  • freshly ground pepper

Directions

-Preheat oven to 400 F. 
-Place salmon in a zip-lock bag or tupperware container.
-Pour in the soy sauce and mirin and mix around so the salmon is evenly coated.
-Marinate in the fridge overnight (or 2 hours at the minimum)
-Remove salmon from the fridge & brush off some of the marinade with a paper towel.
-Place salmon on a foil lined baking tray or dish.
-Pour the vegetable oil on the salmon and sprinkle with brown sugar.
-Top with a few twists of ground pepper.
-Place salmon in the preheated oven.
-Bake for 10-12 minutes, or until the salmon is crispy and tender.
-Serve immediately!

~Enjoy~


Tuesday, August 6, 2013

Recipe Creation: Zucchini + Watermelon Radish Salad


This salad is as simple as can be, and is the perfect "detox" salad for those days when you just want to push the reset button.  You can add feta cheese too if you want it to be a little less detoxy : )  I just swoon over the color of those radishes!

Serves 1

Ingredients

  • 1 green zucchini
  • 1/2 Watermelon radish
  • 2 tsp. Truffle Oil
  • Sea salt, to taste

Directions

-Using a vegetable peeler, peel the zucchini into thin ribbons.
-Continue peeling until you are down to the seeds.
-Place the zucchini ribbons in a bowl.
-Peel and cut the radish in thin slices.
-Place radish slices atop the zucchini and drizzle with truffle oil.
-Sprinkle with salt, to taste.