Wednesday, December 5, 2012

Recipe (Re)creation: Manchego + Rosemary Flatbread


This recipe is shockingly easy.  It is the perfect nibble for a cocktail party and it will disappear in minutes. I always think I'm making a lot of them, and then wish I had made more.  They are that good, and that easy.  The key is that you use tortillas for the crust (shhhhh! It's a secret).  Bake them in a hot oven, and "Voila," they are ready for feasting.  Sprinkle with truffle salt for a little extra flair.

Serves 4

Ingredients:

2 Large Tortillas (white or whole wheat)
Shredded Manchego cheese
Truffle salt (optional)
Rosemary sprigs
Olive Oil

Directions:

Preheat oven to 500 degrees F.
Brush tortillas with a little bit of olive oil and place on a baking sheet.
Top with grated manchego cheese and a few leaves of rosemary.
Bake for 3-4 minutes, watching closely.
Remove from oven, sprinkle with truffle salt, cut into wedges.
Serve immediately.

Tuesday, November 27, 2012

Restaurant (Re)creation: Firefly's Yummy Roasted Brussels Sprouts with Parmesan + Truffle Oil


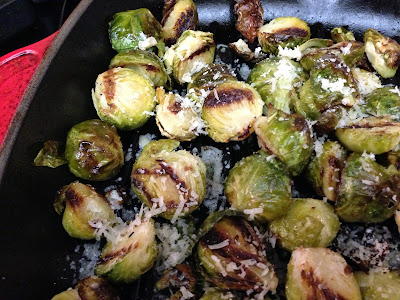
Firefly Restaurant is another favorite neighborhood gem on my regular rotation. These delicious brussels sprouts pop up on the menu at Firefly every year around this time, and I'm always thrilled when they do.  The recipe stays the same year to year, and the dish is consistently memorable.  The preparation is simple, but the flavors complement each other perfectly, yielding a wonderfully indulgent side dish.  I used a cast iron skillet to complete the (re)creation, since I liked the ones at Firefly so much, but any baking sheet or dish will do.  It may not be the exact same recipe, but I don't think you'll be disappointed...

Serves 4

Ingredients:

  • 1 lb brussels sprouts, trimmed and halved
  • 2 tbsp olive oil
  • 2 tbsp freshly shaved parmesan
  • 1/2 tbsp truffle oil, for drizzling
  • salt, to taste

Directions:

-Preheat oven to 400 degrees F.
-Wash, trim, and halve the brussels sprouts.
-Toss the brussels sprouts with olive oil and place in a cast iron skillet or baking dish, cut side down.
-Roast for about 35-40 minutes, or until the leaves start to brown, tossing occasionally.
-Remove from heat and top with shaved parmesan and a pinch of salt.
-Drizzle with truffle oil and serve immediately.

Firefly Restaurant
4288 24th Street
San Francisco, CA
(415) 821-7652
www.fireflyrestaurant.com

Sunday, November 18, 2012

Recipe (Re)creation: Mini Pumpkin + Pecan Pies


These little pies are the perfect treat to complete your Thanksgiving feast.  Not nearly as intimidating as a whole slice of pie, these mini pies give you a little taste of dessert without taking you over the edge.  You can make a variety of different types, but I just focused on my two favorite Thanksgiving flavors and based my creations off of this recipe from Dashing Dish.  These would make great little treats at a holiday party too.  The possibilities are endless...

Makes 30 Mini Pies

Ingredients:

For Pecan Pies

  • 15 mini phyllo shells
  • 1 large egg
  • 4 tsp brown sugar
  • 2 tbsp honey or maple syrup
  • 1/4 tsp vanilla
  • 1/2 cup chopped pecans
  • 1 tbsp butter, melted


For Pumpkin Pies

  • 15 mini phyllo shells
  • 1/3 cup egg whites
  • 1/3 cup pureed pumpkin
  • 1 tsp pumpkin pie spice
  • 1/3 cup sugar
  • 1/3 cup cottage cheese
  • 1 cup whipped cream (optional topping)


-Preheat the oven to 350 degrees F and distribute phyllo shells on two baking sheets.
-In a medium bowl, combine all the ingredients for the pecan pie, except the pecans.
-Then stir in the nuts and scoop 1 small spoonful of the mixture into 15 of the phyllo shells.
-Next, mix all the pumpkin pie ingredients in a blender until smooth.
-Scoop 1 tsp or more of the mixture into each phyllo shell, distributing evenly.
-Bake each sheet of mini pies for 10-15 minutes, watching closely.
-Let the pies cool and top the pumpkin pies with a dollop of whipped cream.
-For an additional treat, serve the mini pies with a generous scoop of vanilla bean ice cream.

~Now you may give thanks~

Monday, November 12, 2012

Restaurant (Re)creation: La Ciccia's Spaghetti with Bottarga


La Ciccia is a cozy little Sardinian gem in Noe Valley.  Though it may appear unassuming from the outside, the food will blow you away.  Reservations at La Ciccia are highly coveted and tricky to get, so try for an early or late dinner on a weekday.   If you do have the luck of snagging a resie, you absolutely must get the spaghetti with bottarga.  I was skeptical at first since the thought of salted mullet roe on pasta didn't really appeal to me, but it surprisingly doesn't taste fishy in the slightest.  It actually just adds a unique, salty, and creamy dimension to the spaghetti.  After my first bite, I decided this definitely needed to be added to my (re)creation list.  The most difficult part of making this dish is procuring the bottarga.  I went to numerous gourmet and specialty stores and struck out.  I ended up finding it online, but if you live in San Francisco, you may be able to find it at Lucca in the Marina or at Bi-Rite in the Mission.  Once you get your hands on the bottarga, the rest is a breeze.  Credits go to La Ciccia for sharing this DELICIOUS treat!

Serves 4

Ingredients:

  • 4 tbsp bottarga (grey mullet roe)
  • 1 lb spaghetti
  • 6 tbsp olive oil
  • 1-2 cloves garlic, thinly sliced
  • 1/2 bunch italian parsley, chopped
  • 1 tsp red pepper, crushed
  • salt

Directions:

-Fill a medium pot with water and a sprinkle of salt.
-Bring to a boil and add the spaghetti.
-In a small saucepan, sauté the garlic and crushed red pepper in olive oil over low heat.
-Once the garlic is fragrant, stir in half of the bottarga, and remove from heat.
-When the pasta is cooked al dente, strain, and then add the pasta to the saucepan.
-Mix in the rest of the bottarga with the pasta and sprinkle with parsley.
-Enjoy immediately with a generous glass of Vermentino.

La Ciccia
291 30th St.
San Francisco, CA
(415) 550-8114
www.laciccia.com

Wednesday, November 7, 2012

Restaurant (Re)creation: Nobu's Black Cod with Miso


I have had this little gem on my list for quite some time.  I first discovered Nobu's mouth-watering miso glazed black cod while in Dubai, and we ordered a second one within second.  Yes, its that good.  Luckily, this too can me made at home, and even on a weeknight.  This recipe is based on the one from the fantastic Nobu Cookbook, but I made a few tweaks to save some time.  The chef recommends that you marinate the cod for at least 4 hours, but 3-4 days is best.  Clearly, that was not in the plans for me, since I rarely have a meal in the works 4 days in advance.  Instead, I marinated the cod for 1 hour in the fridge.  It tasted perfectly delicious to me.  If you have the time, by all means, marinate the fish for longer to get a richer and more pronounced flavor.  However, if you are like me, 1 hour certainly will suffice.  The sweetness and flakiness of the fish is unparalled no matter how long you marinate it.  This dish is notorious worldwide, and once you make it, you will instantly see why.  If you don't, we'll talk. ; )

Serves 4

Ingredients:

  • 1/4 cup sake
  • 1/4 cup mirin
  • 4 tablespoons white miso paste 
  • 3 tablespoons sugar
  • 4 black cod fillets (1/2 lb each)

Directions:

-Bring the mirin and sake to boil in a saucepan over high heat.
-Boil for 20-30 seconds to evaporate the alcohol.
-Turn down the heat to low and stir in the miso paste.
-Once the miso has dissolved completely, add the sugar and turn up the heat.
-Stir constantly until the sugar dissolves completely and remove from heat.
-Allow the marinade to cool completely.
-Meanwhile, take the cod and pat dry with paper towels.
-Place fish in a large bowl or tupperware and slather with marinade.
-Cover and refrigerate for at least 1 hour (or up to 3 days).
-Preheat oven to 400 degrees F and preheat a grill pan or indoor grill.
-Wipe any excess marinade from the fillets.
-Place the fish on the grill (or grill pan) until the surface of the cod begins to brown.
-Next, bake for 10-15 minutes.
-Remove from heat, top with extra marinade and serve with sautéed bok choy.

~Enjoy~


Nobu Restaurants
(Worldwide)

Thursday, November 1, 2012

Recipe (Re)creation: Na'ama's Fattoush


This recipe is from Ottolenghi and Tamimi's long-awaited cookbook, Jerusalem.  I never thought I'd say it, but I like this cookbook even more than Ottolenghi's other cookbook, Plenty.  This one features both Jewish and Arab dishes, and there are both vegetarian and meat-laden dishes to keep just about everyone happy.  This fattoush salad reminds me of my trip to Lebanon and fattoush was one of my absolute favorite discoveries from the trip.  This recipe is delicious as is, but I just added a few twists to make it slightly more satisfying.  I used pita instead of naan and I toasted it so that it kept its integrity and didn't get soggy.  I also topped the salad with a little crumbled feta for some added salt and creaminess.  You can serve this salad with some grilled sausage or extra pita and hummus and you are all set for a perfect weeknight meal.

ps. Buy the Jerusalem cookbook- you won't regret it.

Serves 3-4

Ingredients:

  • 3/4 cup Greek yogurt
  • 1/2 cup milk
  • 2 large pitas, toasted
  • 3 large tomatoes, diced
  • 4 radishes, thinly sliced
  • 3 mini cucumbers, peeled and diced
  • 2 green onion, sliced thinly
  • 5 mint leaves
  • 1/2 bunch flat-leaf parsley, chopped
  • 2 cloves garlic
  • 3 tbsp lemon juice
  • 1/4 cup olive oil
  • 2 tbsp white wine vinegar
  • 1 tbsp sumac
  • 1/4 cup crumbled feta (optional)
  • salt & pepper

Directions:

-To make the buttermilk dressing, start 1 hour in advance.
-Whisk the milk and yogurt together in a bowl.
-Set aside, or place in the fridge until bubbles form to the surface.
-Tear the bread into bite-sized pieces and place in a large mixing bowl.
-Add the buttermilk dressing, and all the other ingredients and mix well.
-Allow flavors to mix for 10 minutes and then spoon the fattoush into serving bowls.
-Drizzle with olive oil and season with salt & pepper.
-Garnish generously with sumac and a sprinkle of feta cheese.

~Enjoy~

Thursday, October 25, 2012

Recipe (Re)creation: Chard, Leek, Corn + Manchego Flatbread


This will be my last corn addition for the season- I'm just thrilled I keep finding it! This recipe is partially inspired by my favorite flatbread dish at Contigo, and partially inspired by a recipe from Smitten Kitchen.  One of my favorite things about Contigo is that they ALWAYS have a flatbread on the menu and it always has manchego cheese on it.  The fun part is, they add a new seasonal ingredient on top, so its a surprise every week.  I just got leeks and rainbow chard in my Albert & Eve delivery, so I decided to combine them (and add corn, of course).  In order to make it "weekday friendly," I cheated and used tortillas instead of making pizza dough, but it created the perfect crispy flatbread that I have been seeking. The result- OMG, this might be my favorite flatbread combination!  I know that is a bold statement, but you'll have to try it yourself to prove me wrong.  Take that as a challenge.

Serves 4

Ingredients:

  • 3 leeks, stalks removed
  • 1 bunch rainbow chard
  • 1 ear of corn, cut off the cob
  • 4 whole wheat tortillas 
  • 3/4 cup freshly shaved manchego
  • 1/2 cup crumbled goat cheese
  • Salt & Pepper
  • Olive oil

Directions:

-Preheat oven to 450 degree F.
-Cut the green stalks off the leeks, and cut the remaining white parts lengthwise.
-Next, cut those halves in 1/2 inch rounds.
-Soak leek slices in cold water to remove dirt and scoop them out onto a paper towel to dry.
-Wash and dry chard and cut into 1/2 inch ribbons.
-Heat a medium skillet over low heat and add 1 tbsp. olive oil.
-Toss in leeks and cover.  Cook, stirring occasionally, for about 10 minutes.
-Add the chard and cook until the chard is tender.
-Next, add the corn and cook for 1-2 minutes.
-Season with salt & pepper.
-Meanwhile, brush tortillas with a scant amount of olive oil and place on a baking sheet.
-Sprinkle tortillas with manchego cheese shavings.
-Spoon the corn, leek, and chard mixture on the tortillas.
-Top with crumbled goat cheese and place in the oven.
-Cook for about 10 minutes, or until the tortillas begin to brown and the cheese melts.
-Serve immediately.

*Any extra chard, leek & corn mixture makes for an excellent side dish*

Friday, October 19, 2012

Recipe Creation: Acorn Squash, Poblano, + Corn Tacos


This creation was inspired by a delivery of acorn squash in my weekly fruit and vegetable box from Albert & Eve.  I have been on a Mexican food kick, so I decided to create an acorn squash taco.  You can use any vegetables on hand and get creative with it.  I used white onions, yellow bell peppers, poblanos, jalapeños and corn to complement the roasted squash.  Top it all with a sprinkle of queso fresco and you have the perfect taco for a warm fall evening.

Serves: 3-4

Ingredients:
  • 1 acorn squash, cut in 1 inch wedges
  • 1 white onion, diced
  • 1 yellow bell pepper, diced
  • 2 ears of corn, cut off the cob
  • 1 poblano pepper
  • 1 jalapeno, diced
  • 3 tbsp queso fresco
  • Tortillas
  • Olive oil
  • Salt & pepper

Directions:

-Preheat the oven to 400 degrees F.
-Meanwhile, brush the squash wedges with olive oil and season with salt and pepper.
-Place squash on a baking sheet and roast for 20 minutes.
-Next, turn the stove top on medium and place the poblano pepper directly on the burner.
-Rotate the poblano until all sides are charred and the skin is blistered.
-Let the poblano cool, then pull off the skin, remove the seeds and cut the poblano in strips.
-Heat a skillet on medium heat and drizzle with olive oil.
-Sauté the onions, bell peppers, and jalapeño.
-Remove the squash from the oven, pull of the skin and cut it into 1 inch cubes.
-Put the tortillas is tin foil and place in the oven to warm.
-Add the corn and squash to the other vegetables in the skillet.
-Sauté for 1-2 minutes until all of the vegetables are tender.
-Remove the vegetables from heat and season with salt & pepper.
-Scoop the vegetable mixture into the warm tortillas and sprinkle with queso fresco.

Enjoy!

Wednesday, October 17, 2012

Recipe Creation: Mexican Street Corn Crostini


I have a total obsession with corn and I always have bittersweet feelings about this time of year.  As much as I love fall and winter vegetables, I know this is my last chance to get fresh corn.  Since the season is coming to an end, I figured I needed to take advantage of these last few weeks of availability.  This recipe puts the deliciousness of Mexican street corn right on a perfectly grilled slice of ciabatta.  A perfect marriage of flavors, and just in time!

Makes 12

Ingredients:
  • 2 ears of corn, shucked
  • 1/4 cup light sour cream
  • 5 tbsp queso fresco
  • Ciabatta, sliced
  • Chili powder
  • Olive oil
  • Vegetable oil
  • 3 tbsp cilantro, chopped
  • 1 lime, quartered
  • Salt & Pepper


Directions:

-Preheat grill to medium.

-Rub corn with vegetable oil and season with salt and pepper.

-Grill until slightly browned, but still firm.  Cut the corn off the cob in chunks.

-Meanwhile, brush ciabatta slices with olive oil and grill until toasted.

-Mix the sour cream with 3 tablespoons of queso fresco.

-Smear the mixture on each slice of grilled ciabatta.

-Top each slice with grilled corn, a pinch of chili powder and a little cilantro.

-Sprinkle with extra queso fresco, salt & pepper, and a squeeze of lime.

¡Que Rico!


Tuesday, October 2, 2012

Restaurant (Re)creation: Jackson Fillmore's Zucchini Carpaccio


This recipe is loosely based on an iconic salad from a little San Francisco trattoria called Jackson Fillmore.  It is one of those dishes that always stays on the menu- and for good reason.  It's simply divine.  My (re)creation is a bit different, but the essence and simplicity of the salad remain.  For my version of the dish, I used a combination of zucchini and summer squash and used a vegetable peeler to create the thin ribbons.  I also opted for toasted pine nuts instead of almonds and garnished the salad with a few leaves of fresh torn basil.  The best part about this dish is, there is no cooking involved (other than toasting the pine nuts).  You can either serve this salad warmed in a skillet or you can serve it cold and straight from the bowl.  It's a perfect addition to a lazy weeknight meal.

Serves 3-4

Ingredients:

  • 2-3 zucchini or summer squash
  • Slice of lemon
  • Olive oil
  • Shaved Pecorino
  • 3 tablespoons toasted pine nuts (or almonds)
  • 3 fresh basil leaves, torn

Directions:

-Wash and dry the zucchini and squash.
-Using a vegetable peeler, shave thin ribbons of the vegetables into a medium bowl.
-Squeeze a small amount of lemon over the vegetable ribbons and drizzle with olive oil.
-Season the salad with salt and pepper, and sprinkle with thick slices of Pecorino.
-Garnish with torn basil and serve immediately.

And if you're a purist, here is the original recipe from Jackson Fillmore (in video form):


~Video courtesy of Jackson Fillmore~


Jackson Fillmore
2606 Fillmore Street
San Francisco, CA
(415) 346-5288
jacksonfillmoresf.com

Monday, September 24, 2012

Recipe (Re)creation: Fried Egg and Avocado Pita


This is what I would consider a weekend creation that is easy enough for a weekday and perfect for breakfast, lunch, or dinner.  It's sort of like the all-purpose meal and is the ultimate comfort food.  It was inspired by an avocado that was sitting in our fruit bowl looking perfectly ripe and ready to eat.  It was given to my husband by a coworker whose family has an avocado farm, so I knew this was going to be amazingly fresh and I wanted to put it to good use.  While scouring recipes and ideas, I came across this one on What Gaby's Cooking. I just tweaked the quantities and proportions a bit and it was an instant hit.  The citrusy smashed avocado blends perfectly with the creamy yolk, and the best part is: it can all be sopped up with the pita.  One bite of this takes me straight to my happy place- whether it's the weekend or not.

Ingredients:
  • 1 small ripe avocado
  • 1/4 of a lemon
  • 2 fresh eggs
  • 2 pitas
  • salt & pepper

Directions:

-In a bowl, mash the avocado until it is fairly smooth.  
-Squeeze with a little bit of lemon and season with salt and pepper.
-Meanwhile, heat up pitas, either in the oven or in a toaster.
-Heat a non-stick skillet over medium low heat.
-Crack an egg into a cup and gently pour into the skillet.  
-Cook until whites are set and the edges of the egg start to brown.
-Repeat with the second egg and set aside.
-Spread each warmed pita with avocado, and top with a fried egg.
-Season with salt and pepper.

*Optional- for an added kick, top with hot sauce or red chili flakes.


Sunday, September 16, 2012

Restaurant (Re)creation: Tartine's Kale Caesar


The bread at Tartine Bakery is legendary and sells out within an hour almost every day.  While I LOVE their bread, I am still of the mindset that I would rather buy it than make it.  So buy it I do!  The best part is, you don't have to eat it all in one day one at the risk of having to throw it out once it is no longer fresh.  Their day-old bread is perfect for homemade croutons.  Really any day-old high quality bread will do.  These croutons pair perfectly with most salads, but especially this kale caesar below.  I just got Red Russian Kale delivered in my vegetable box from Albert & Eve and it was the perfect incentive to try out this recipe.  I got it straight from The Tartine Bread Cookbookand made just one small change.  I used fewer anchovies in the dressing than the recipe calls for, since I'm not a huge anchovy fan, but other than that, it's true to the original.  The recipe is fairly simple, healthy, and the perfect addition to a weekday meal.  Plus, you don't have to wait in long line at Tartine to enjoy this- you can have it in the comfort or your own kitchen.  What could be better?

Serves 4-6

Ingredients

For the croutons:

  • 4 slices day-old country bread (or any rustic baguette)
  • 2 tablespoons olive oil
  • salt

For the Caesar dressing:

  • 2 lemons
  • 3 cloves garlic, diced
  • 5 olive oil-packed anchovy fillets
  • 1 large egg yolk
  • Salt
  • 2 cups olive oil

For the salad:

  • 2 lbs kale, center stem removed
  • 2/3 cup shaved aged parmesan

Directions


Preheat the oven to 400 degrees F.  Tear bread into 1 1/2 inch chunks and toss with olive oil and a pinch of salt.

Spread the bread evenly on a baking sheet and bake for about 12 minutes, or until golden brown.  Remove from head and set aside.

To make the dressing, grate the zest from 1 lemon.  Put the garlic, anchovies, and lemon zest in a mortar and pestle and pound to make a thick paste.

Add the egg yolk, a pinch of salt, and a squeeze of lemon juice and stir to combine.  While stirring, pour in 1/2 cup of the oil a little bit at a time.  The mixture should look smooth and creamy.  Continue adding the oil as you stir until the dressing thickens, adding squeezes of lemon periodically.  Add salt and lemon juice to taste and add water (one spoonful at a time) until dressing thins to the consistency of heavy cream.

Combine kale and croutons in a large bowl.  Pour the dressing over the kale and toss.  Top with Parmesan and serve immediately.

Enjoy!

Tartine Bakery
600 Guerrero Street
San Francisco, CA
(415) 487-2600
www.tartinebakery.com

Wednesday, September 5, 2012

Recipe (Re)creation: Gwyneth's Chicken Paillard


I am not a huge fan of chicken.  There are so many chicken recipes that are boring or bland so I'm usually turned off.  However, if I'm going to have chicken, there are three preparations I like: roasted chicken, chicken spiedini, and chicken paillard.  Of the three, chicken paillard is by far the easiest and it  is so juicy and delicious.  I based this recipe on a recipe that Gwyneth Paltrow shared on her blog GOOP.  Its beautiful in its simplicity and the flavors are all clean and pair with one another seamlessly.  I served the chicken over a simple arugula salad with shaved pecorino, sliced cherry tomatoes, olive oil and a squeeze of lemon.  Its a perfect little one-dish wonder and literally takes 5 minutes to cook!

Ingredients:

  • 2 chicken breasts
  • 1 tablespoon flour
  • Olive oil
  • 1/2 lemon
  • Salt & pepper 

Directions:

Place the chicken breasts between two sheets of parchment paper or saran wrap.  

Pound the cutlets with a heavy pan until they are about 1/4 inch thick.  

Season both sides of the cutlets with salt, pepper, and a small amount of flour.

Coat the surface of a skillet with olive oil and put on medium to high heat. 

Cook each chicken breast for 2-3 minutes on each side.  

The skin should start to crisp up and brown but the inside should be tender and juicy.  

Serve over a a simple arugula salad (see above).

Simply delicious!


Wednesday, August 29, 2012

Recipe Creation: Grilled Fig, Peach + Goat Cheese Pizza


This recipe is easy, seasonal, and perfect for a warm evening when you want to get out and take advantage of your grill (or someone else's).  You can throw on any of your favorite ingredients and change it based on whatever is in season, or happens to be in your fridge.  I use pita bread as the crust because it makes nice individual pizzas, but you can also use pre-made or homemade pizza dough.  If you are like me though, making homemade pizza dough after work is not in the cards.  You can take this concept on the road too, and have a little "pizza bar" and your guests can make their own personal pizzas with different toppings.   The possibilities are endless...

Serves 2

Ingredients:

  • 2 pitas (whole wheat or white)
  • 1/2 cup part-skim ricotta
  • 1/4 cup crumbled goat cheese
  • 4 figs, sliced thinly
  • 1 peach, cut in quarters and sliced thinly
  • 1/4 shallot or red onion, sliced thinly
  • Olive oil
  • Salt and pepper to taste


Directions:

-Preheat grill on medium-high heat.

-Meanwhile, sauté shallots in olive oil until translucent and slightly crispy.

-Remove shallots from heat and set aside.

-Spread about 1/4 cup ricotta on each pita and top with sliced figs and peaches.

-Sprinkle with crumbled goat cheese.

-Place pita pizzas on the grill and cover.

-Grill pizzas for 10-15 minutes, or until the pita begins to crisp and the cheese begins to melt.

-Top with crispy shallots, and season with salt and pepper.

~Enjoy~


Sunday, August 19, 2012

Restaurant (Re)creation: Hog Island's BBQ'd Oysters


If you are going to have oysters in Northern California, you can't go wrong with the fresh little bivalves from Pt. Reyes.  Hog Island Oysters is a favorite spot to stop for BBQ'd oysters and wine on picnic tables overlooking Tamales Bay.  I just experimented with their BBQ'd oyster recipe from The Hog Island Oyster Lover's Cookbook and the recipe was quite a hit.  I made them for a lawn party we had and doubled the recipe and they disappeared in minutes!  Now you can bring Pt. Reyes home with you and enjoy your own BBQ'd oysters with a nice glass of bubbly in your backyard.

Makes 2 dozen oysters

Ingredients:

  • 1 cup ketchup
  • 1/4 cup Worcestershire sauce
  • 3 cloves garlic, crushed
  • 2 tbsp honey
  • 2 tbsp freshly squeezed lemon juice
  • Dash of Tabasco sauce
  • 2 dozen small Sweetwater oysters

Directions:

-In a medium bowl, combine all ingredients and stir to blend.  Cover and let sit for an hour.  (Sauce can be made up to 2 days ahead).
-Prepare a medium hot fire in a charcoal or gas grill.  Place shucked oysters on the center of the grill and spoon 1 tbsp of sauce onto each oyster.
-Cover grill and cook for 3-5 minutes, or until the sauce begins to bubble.  Don't overcook!  
-Serve immediately on a rock salt lined platter.
-Eat them quickly before the disappear!


Hog Island Oyster Farm
20215 Shoreline Highway
Marshall, CA 94940
(415) 663-9218

Thursday, August 2, 2012

Restaurant (Re)creation: Nopa's Corn Soup with Walnut Pesto


I found this recipe in The Bay Area Homegrown Cookbook by Aaron French, which features tons of great recipes from local bay area chefs.  Nopa happens to be one of my favorite spots and I have yet to have a bad meal there.  Chef Laurence Jossel generously shared this corn soup recipe in French's cookbook and I couldn't be happier.  The only thing I did differently is I didn't strain the soup through a colander and instead opted for a thicker consistency.  Either way, the flavor combinations are dynamite.  Take advantage of this recipe now while corn is in season and readily available at the farmers' market.  Enjoy!

Ingredients:

For the soup:

  • 3 medium yellow onions, diced medium
  • 1/2 clove garlic, sliced
  • 1 jalapeño
  • 2-3 tbsp. olive oil
  • 12 basil leaves
  • 10 ears corn
  • 1 cup cream
  • salt, to taste
  • water, as needed

For the walnut pesto:

  • 1/2 cup shelled walnuts
  • 1 clove garlic
  • 3 tbsp grated parmesan
  • 1/2 cup extra virgin olive oil
  • 10 fresh basil leaves
  • salt and pepper, to taste

Directions:

For the soup: 

-Gently sweat the onions, garlic, and jalapeno in the olive oil until onions are translucent, about 15 min.
-Season lightly with salt and add the corn, cream, and enough water to cover.  
-Simmer slowly for 20 minutes.  
-Puree the soup and strain through a large-holed colander.  
-Adjust seasoning and serve with a dollop of walnut pesto garnish and basil leaves.

For the walnut pesto:

-Combine all ingredients except the basil in a food processor and puree until smooth.  
-Add the basil and puree quickly, keeping in mind that the basil will turn brown if blended more than necessary. 
-Stir in salt and pepper to taste.

Serves 6

Nopa
560 Divisadero St.
(415) 864-8643

Thursday, July 12, 2012

Restaurant (Re)creation: Bi-Rite's Honey Lavender Ice Cream


I was surprised by how much I liked this ice cream.  I am always a sucker for cookies and cream, or vanilla bean, or something with chocolate or caramel, but wasn't so sure about an herbal ice cream.  Leave it to Bi-Rite Creamery to turn an herb into a delicious ice cream flavor.  It smells like a spa, and tastes like heaven with the perfect combination of honey and lavender.  Even though it's creamy, it somehow manages to be very refreshing and light.  In terms of ingredients, I would recommend using organic dried lavender and Strauss dairy products, if you can find them.  It's a bit of a labor of love to make, but totally worth it.  Plus, though it might not be "healthy," it totally feels like spa ice cream ; ) We can thank Sweet Cream and Sugar Cones for this fabulous recipe.

*ps. You will need an ice cream machine

Ingredients:

  • 1 3/4 cup heavy cream
  • 3/4 cup low fat milk
  • 1/2 cup honey
  • 1/4 teaspoon kosher salt
  • 2 tablespoons organic dried lavender
  • 5 large egg yolks

Directions:

In a heavy saucepan over medium-high heat, stir together the cream, milk, honey and salt.

Once the mixture begins to bubble, remove from heat and whisk in the lavender.  Cover and let steep for 15 minutes.

Strain through a fine-mesh strainer into a bowl and wash out the saucepan.  Return cream mixture to the pan.

In a medium bowl, whisk the eggs to break them up.

Put the pan of cream and milk over medium-high heat.  When the mixture begins to simmer, reduce heat to medium.

Carefully scoop 1/2 cup cream mixture to the bowl with the yolks, whisking the eggs constantly. Then add another 1/2 cup cream mixture and continue whisking.  Leave the remaining cream mixture
in the pan.

Now carefully pour the egg and cream mixture back into the pan with the cream and stir with a spatula.

Cook on medium heat, stirring constantly until it is thickened and coats the back of the spatula (1-2 minutes).

Strain the mixture through a fine mesh strainer into a clean container and set in an ice bath (bowl with ice water in it).  Once it is cool, remove the container, cover it, and refrigerate for 1-2 hours (or overnight).

Freeze in your ice cream machine according to directions.

Enjoy right away or, for a firmer ice cream, freeze for at least 4 hours.

Bi-Rite Creamery
3692 18th Street
San Francisco, CA
(415) 626-5600
biritecreamery.com


Tuesday, July 3, 2012

Recipe (Re)creation: Burrata Summer Salad


Happy 4th of July!  I made this lovely little salad for a BBQ I threw over the weekend and it disappeared within minutes.  I based it on this recipe from What's Gaby Cooking.  The key to the salad is fresh, seasonal ingredients.  Look for white peaches, colorful heirloom tomatoes, basil, and fresh white corn at the farmer's market.  With the basil in particular, the smell alone will make you swoon.  When you buy the burrata, make sure its packed in salted water in a little plastic baggy.  It is best when eaten within 24 hours but that shouldn't be a problem.  I guarantee this salad will be gone well before the fireworks can attempt steal its thunder.

Ingredients:
  • 2 ears of white corn, shucked and cut off the cob
  • 3 heirloom tomatoes, sliced
  • 2 white peaches
  • 5 ounces burrata, torn
  • 6 large basil leaves, sliced thinly
  • Sea salt flakes (Maldon is best)
  • Balsamic reduction


Directions:

-Assemble all vegetable and fruit ingredients in a large bowl.
-Top with creamy bits of burrata and fresh basil slices.
-Sprinkle with sea salt flakes and drizzle with balsamic reduction.
-Serve (and devour) immediately.


Saturday, June 23, 2012

Recipe (Re)creation: Homemade Refrigerator Pickles

~From top: pickles on day 1, pickles on day 3 ~

I recently discovered Omnivore Books in my neighborhood and came across a book signing + pickle making class featuring food blogger/cookbook writer Marisa McClellan. Not only did I buy her fabulous book, Food in Jars, but I also had the pleasure of making my own homemade refrigerator pickles.  They are incredibly tasty and are deceptively easy to make.  It can be your new party trick.  Homemade pickles? Don't mind if I do...

Ingredients

  • 5 peppercorns
  • 2-3 shakes of dill seed
  • 1 garlic clove, peeled
  • 1 english cucumber, quartered
  • 1 1/2 cups apple cider vinegar
  • 1 1/2 cups water
  • 1 pinch pickling salt

Directions


-Put sliced cucumbers and all dry ingredients in a mason jar.
-Boil the water and vinegar in a pot.
-Pour the water + vinegar brine into the jar with the cucumbers.
-Seal the jar and refrigerate for 3-4 days.
-Enjoy!

Tuesday, June 5, 2012

Flavors of the Month: June

  • Watermelon Mojito Poptails- I made these a few weekends ago for a BBQ and they were a total hit! The peppermint extract adds a surprising twist.  They are amazingly refreshing and oh-so-subtly boozy.
  • Maker's 46- Just as advertised, it's "a complex whisky with a taste that doesn't need to be acquired."  Great on the rocks and very sippable (even for a novice like myself).
  • Blue Star Beer- This wheat beer is the perfect brew for a warm summer day.  It is light, fruity, and refreshing.  It's similar in body to Blue Moon, but its even tastier.
  • Sweet Potato Pop Chips- This flavor is brand new and is arguably the best!  It's sweet, salty and incredibly delicious.  
  • Weber S-310 Grill- We just bought this grill and love it.  It has two side tables, front-mounted control knobs, and ample grilling space.  It pricey but totally worth it.
  • Pasta Gina- This little pasta shop is my new favorite spot in Noe Valley.  The owners, husband and wife team Gino and Gina, make fresh pasta, sauces, salads and desserts every morning.  Their homemade pasta and their tiramisu are my current obsessions.  Such a great find!
  • Bi-Rite Creamery- This Mission staple is famous for their cones and sundaes made exclusively from Straus Family Creamery products.  Salted caramel is their most sought-after flavor, but all of them are incredible.  You can also order custom ice cream sandwiches, ice cream cakes, and sundaes for your next party.  You'll be the coolest kid on the block.

Monday, May 28, 2012

Restaurant (Re)creation: Wayfare Tavern's Popovers with a Neimen Marcus Twist


This was a very difficult decision for me.  I went back and forth between which popover recipe to use.   Both Wayfare Tavern (Tyler Florence's SF restaurant) and Neimen Marcus are quite famous for their buttery, soft, and crispy popovers.  Their recipes are very similar, the only main difference is that the Wayfare Tavern recipe contains butter (which clearly ups the yum factor).  It was such a close call that I decided to combine both recipes.  I followed the recipe for the Wayfare Tavern Popovers, but decided to pair them with the strawberry butter recipe which make the Neimen Marcus ones so addictive.  The final verdict- a fabulous compromise.  Hope you enjoy them!  Credits go to the cookbooks Tyler Florence Family Meal and The Neimen Marcus Cookbook

Makes 12 popovers

Ingredients:

For popovers:

  • 6 large eggs, room temperature
  • 3 1/2 cups whole milk, room temperature
  • 4 tablespoons (1/2 stick) unsalted butter, melted and cooled
  • 4 cups flour
  • 1 1/2 teaspoons kosher salt
  • 1 teaspoon baking powder

For strawberry butter:

  • 1 1/2 cups butter, room temperature
  • 1 cup good quality strawberry preserves


Directions:

-In a blender or standing mixer, combine eggs, milk, and melted butter.  Blend on high until smooth, about 10 seconds.

-In a large bowl, sift together the flour, salt, and baking powder.  Add the dry mixture to the wet and blend, until just combined (10-15 seconds).

-Let the batter sit at room temperature for 1 hour.

-Preheat the oven to 450 degrees F.  Place an oven rack in the middle position and place an empty popover or muffin tin on the rack.  Once the pan is hot, remove it and coat evenly with nonstick spray.

-Working quickly, fill the molds almost to the top with batter.  Immediately place back in the oven and bake for 15 minutes, then reduce heat to 375 degrees F and bake an additional 20-25 minutes, or until deep and golden brown.

-Do not open the door as the popovers bake, as it could cause them to collapse.  Once golden brown, remove from the pan and let cool on a wire rack.  To keep the popovers crispier for longer, use a skewer to carefully pierce the sides of the popovers allowing steam to escape.

-Meanwhile, place the butter in the bowl of an electronic mixer and beat on high until fluffy and light.  Add the preserves and beat until well combined.  With an ice cream scooper, scoop the butter into ramekins and serve immediately.

-Serve popovers with generous spoonfuls of strawberry butter.


Wayfare Tavern
558 Sacramento Street
San Francisco, CA
(415) 772-9060
www.wayfaretavern.com

Neiman Marcus
150 Stockton Street
San Francisco, CA
(415) 362-3900
www.neimenmarcus.com